The Comic Template
The comic template is rather complicated because, besides character pages, comics are our bread and butter on the DC Database. Despite being complicated under the hood, though, it's actually pretty straight forward for new users!
But let's walk through all of the fields and sections, just so we know that we're doing it right, yes? Yes.
If you need a refresher on how templates work on this wiki, you might want to have a look at this article first.
Naming the Page
So, what do you call a wiki article about a comic book? Well, we use a specific naming standard all across the site for this.
Every comic book page is named using three pieces of information: The name of the series, the volume number for that series, and the issue number for that issue.
So, Issue #5 of Volume 2 of Adventures of Superman would be named using the name of the series (Adventures of Superman), the Volume number (2), and the issue number (5).
And we format that like this: Adventures of Superman Vol 2 5.
That's right! No "#" signs, and "Vol", not "Volume".
If, however, you are creating a page for a standalone graphic novel, like Batman: Noël, you don't need to use the Volume number and issue number in the page name, because the book doesn't have either of those.
So, if you are creating a new comic page, be sure that you aren't making a page that already exists, and that you are creating it for the right volume of the series.
Adding the Template
Now that you've named the page, you can add the Comic Template using the "insert comic template" button on the edit toolbar.
It looks like this! ![]()
And here's the empty template that will appear in the edit box once you've done so:
{{DC Database:Comic Template
| Title               =
| Image               =
| Volume              =
| Issue               =
| Day                 =
| Month               =
| Year                =
| Rating              =

| Executive Editor    =
| CoverArtist1        =

| Writer1_1           =
| Penciler1_1         =
| Inker1_1            =
| Colorist1_1        =
| Letterer1_1         =
| Editor1_1           =

| Quotation           =
| Speaker             =

| StoryTitle1         =
| Synopsis1           =

| Appearing1 =
'''Featured Characters:'''
* <br/>
'''Supporting Characters:'''
* <br/>
'''Villains:'''
* <br/>
'''Other Characters:'''
* <br/>
'''Locations:'''
* <br/>
'''Items:'''
* <br/>
'''Vehicles:'''
* <br/>

| Notes               =
| Trivia              =
| Recommended         =
| Links               =
}}
Don't let the size of this page fool, you! Each of the fields is relatively straightforward, as you can guess from their names.
Let's break it down, section by section, to make things easier.
Basic Issue Information
For starters, let's look at what the basic issue information looks like when it's filled out properly:
| Title               = Batman
| Image               = Batman Vol 2 10.jpg
| Volume              = 2
| Issue               = 10
| Day                 = 13
| Month               = 8
| Year                = 2012
| Rating              = T
Title
The Title field is, essentially, the name of the book that you are creating. If it's part of an ongoing series, then the name of that series belongs in the Title field.
For example, Batman (Volume 2) #30's Title would be "Batman", while Tiny Titans: Return to the Treehouse #1 uses the Title "Tiny Titans: Return to the Treehouse."
In almost every case, the title will be the name of the page you're creating, without the volume number and issue number. The field is typically used for certain parts of categorization, so y'need to fill it out.
Images
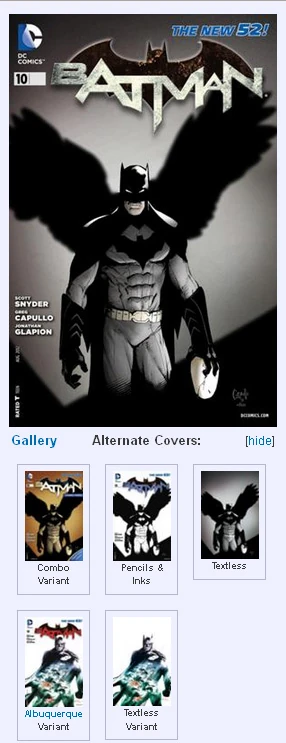
The main cover image, with alternate covers section expanded
As with other templates, the image field is used to give the article a bit of visual flare.
For comic issues, though, its role is to display the cover art for that issue.
If the cover art isn't on the wiki yet, you can upload it yourself (and ensure that you fill out the image template properly with the help of the guidelines laid out here and here).
Once you've uploaded the image, all you need to do is input the filename and its extension.
So, for Batman (Volume 2) #30, the cover art image is located at Batman Vol 2 30.jpg and "Batman Vol 2 30.jpg" is exactly what you'd type in.
There's no need to use [[File:Batman Vol 2 30.jpg]]. That's done automatically within the template.
We also have additional image fields (Image2, Image3, Image4, etc...) that can be used for variant covers and alternate covers. Typically, we include the "Textless" (or "virgin" if you're a creepo) version of the cover among these, if it is available.
You can then use "Image2Text, Image3Text, Image4Text" etc to describe what the image is. This description is then used as alt-text for the visually impaired and for image metadata.
For example, Batman (Volume 2) #30 was solicited using Batman Vol 2 30 Textless.jpg (which was, again, filled out using guidelines given here). We would then use Image2 to include the Textless cover art, and then use Image2Text to write "Textless" just for that extra alt-text functionality.
Similarly, if there were a variant cover for the issue as well, we would first upload it and fill out its image template using guidelines outlined here, and then include it on the comic page under Image3 as Batman Vol 2 30 MAD Variant.jpg and fill out Image3Text with information like "Mad Magazine Variant", just so it's clear that this is a variant. In many cases, we might include the artist of the variant in that description, like "Ivan Reis Variant." And if, say, there were a textless version of that variant, we could add it with Image4, writing "Textless Mad Magazine Variant" under Image4Text, just like we did with Image2 and Image3.
Here is an example of a properly filled out Images section from Batman (Volume 2) #10:
| Image               = Batman Vol 2 10.jpg
| Image2              = Batman Vol 2 10 Combo.jpg
| Image2Text          = Combo Variant
| Image3              = Batman Vol 2 10 Sketch.jpg
| Image3Text          = Pencils & Inks
| Image4              = Batman Vol 2 10 Textless.jpg
| Image4Text          = Textless
| Image5              = Batman Vol 2 10 Variant.jpg
| Image5Text          = [[Rafael Albuquerque]] Variant
| Image6              = Batman Vol 2 10 Textless Variant.jpg
| Image6Text          = Textless [[Rafael Albuquerque|Albuquerque]] Variant
Volume & Issue
This field is meant to be filled out with the volume number of the series the comic belongs to.
So, in Batman (Volume 2) #30, the volume number is 2, so you would fill the field out with "2"—it's that simple.
This field is used for what we like to call "Category Magic," which is why it's important that you fill it out where possible.
Like Volume, the Issue field is meant to to be filled out with the issue number of the comic you're filling out.
So, in Batman (Volume 2) #30, the issue number is 30, which means you fill out the field with "30".
And like Volume, the Issue field also is used by Category Magic, making it another mandatory field.
With issue, at least, it is typically printed right there on the cover.
Day, Month, and Year
Day
The Day field is a relatively new addition to the template, so some older pages may not have it.
It is used in category sorting, and is a helpful indicator of just when a book came out.
It represents the actual day of the month on which the comic was released. So, if the comic came out on Wednesday, September 3rd, the Day field would be filled out with "3".
An important thing to be aware of with the Day field, though, is that the category that is created by the input may not represent the day you entered.
The template is designed to send the comic into the category for the nearest Wednesday, because comics have traditionally come out on Wednesdays for decades, and as it happens, Wednesday falls smack in the middle of the typical week. So, if a comic came out on Thursday the 4th instead, for whatever reason, it will still be put in the category for Wednesday the 3rd.
Month
The Month field is a trap that many new users fall into unwittingly, so let's start with a lesson about periodical publications.
Most magazines and comic books publish on a periodical basis with a date printed on the cover. That cover date does not represent the month in which the book was published.
The cover date is actually the date at which the issue is meant to be pulled from the shelves!
That's why this is sometimes called the "pull date".
On average (though there are exceptions) DC has set these cover/pull dates at two months ahead of the actual publication date (or "street date").
When you fill out the Month field, we want you to use the cover date.
Some fancy math behind the scenes tells the template to put the comic in categories for both the cover date and the publication date. So, if the comic came out on September 3rd, 2014 the Month field should then be filled out with "November" or "11" (either the word or the number will work).
This is all less complicated than it sounds because, whatever the situation, what you put into the Month field will be printed right on the cover. So, don't get hung up on when it actually came out.
'Note: As of 2024, DC has removed the cover date from the cover. It can still be found in the indicia.
Year
The year field represents the year that is typically included with the cover date on most modern comics.
As with the month field, the year should correspond to the month printed on the cover, and not the actual year in which it was published.
A comic that came out in November of 2011 will have a cover date of January 2012, and you should therefore fill the Year field with "2012" in that case. And like Month, fancy maths are used to tell the template to shove the comic into categories for both the year on the cover and the year it actually was when it was published, so you don't need to worry about that.
Unless, of course, it didn't come out two months before the date on the cover...
Pubmonth & Pubyear
If an issue was delayed for some reason, as is sometimes the case, you should use the optional "Pubmonth" and "Pubyear" fields to fill out the month and year the issue was published.
Note, though, that for complicated template reasons, you must fill out Pubyear and Pubmonth, even if the month or year is the same as the date on the cover.
Likewise, you should fill out the regular month and year fields in addition to Pubmonth and Pubyear, for the cover date categories.
So, just for example, if a comic's cover date says May of 2003, but the book was delayed from its original publication month of March to April (because March is two months before May), then the Pubmonth field would be filled out with April (or 4) and the Pubyear would still have to be filled out with "2003", or it won't work.
The Day field is unaffected by the Pubyear and Pubmonth fields, except in that the Day would correspond to the delayed date—which, for example, might be the 24th of April, despite being solicited for the 12th of March.
Complicated? Yes, a bit, but in most cases, it's as simple as filling out the month and year that are right on the cover of your comic!
Rating
Not every comic will have a rating on it, but as of mid-2011, most DC comics were printed with one of the following ratings:
When you fill the field out with one of those four ratings (you only need to use the letters), it will place the rating information in the infobox, and it will add the issue to a rating category.
This helps concerned parents ensure that they're buying kid-friendly titles when they need to, and it helps maybe the more adult readers find the more mature titles that suit their more mature tastes! Not too shabby.
Event
This field is optional, but it is used to categorize the issue as being part of a particular event or storyline.
It will also place a "This issue is part of X event/storyline" message within the infobox, at the top.
So, if an issue was part of the Infinite Crisis event, we would tie it in by filling out the Event field with "Infinite Crisis". Additional events (if there are more than one) can be added by separating them with semi-colons— "Infinite Crisis; Rann-Thanagar War; OMAC Project".
Prev/NextIssue & OneShot
The PreviousIssue and NextIssue fields are optional because the template will automatically use the issue number of the page itself to determine what number the previous and next issues should be. However, if the next or previous issue is not the next logical number in the sequence, you can use these fields to override it. For example, in September of 2012, DC put out several "zero issues", where the number of the issue was 0, and it fell between issues #12 and #13. We used PreviousIssue and NextIssue to ensure that the 0 issue falls between them in the template, too.
If the issue happens to be the first or last issue in the series, you can simply enter an em dash (—) to prevent the previous or last issue's number from being guessed at by the template.
If an issue is a one-shot special or a graphic novel, we use the "OneShot" field.
We fill the field out with information like the featured character in the issue or the event the issue is related to. For example, a one-shot starring Batman would just fill out the field with "Batman", which would add it to the category "Batman OneShots." You might also use an event to distinguish the issue as a oneshot belonging to that event, like "Infinite Crisis OneShots." By virtue of merely being filled out, the field also uses the year field to create a "[Year] OneShots" category. Multiple one-shot inputs can be separated by semicolons—"Batman; Infinite Crisis"
Credits
Just to start, here is an example of a properly filled out credits section from Batman (Volume 2) #10:
| Executive Editor    = Eddie Berganza
| CoverArtist1        = Greg Capullo
| CoverArtist2        = FCO Plascencia
| Cover2Artist1       = Rafael Albuquerque

| Writer1_1           = Scott Snyder
| Penciler1_1         = Greg Capullo
| Inker1_1            = Jonathan Glapion
| Colorist1_1        = FCO Plascencia
| Letterer1_1         = Richard Starkings
| Letterer1_2         = Jimmy Betancourt
| Editor1_1           = Mike Marts
| Editor1_2           = Katie Kubert <!-- assistant editor -->

| Writer2_1           = Scott Snyder
| Writer2_2           = James Tynion IV
| Penciler2_1         = Rafael Albuquerque
| Inker2_1            = Rafael Albuquerque
| Colorist2_1        = Dave McCaig
| Letterer2_1         = Dezi Sienty
| Editor2_1           = Mike Marts
| Editor2_2           = Katie Kubert <!-- assistant editor -->
Executive Editor
The executive editor is a role that has existed for some time within DC Comics.
While the Editor-in-Chief runs the whole show, the Executive Editor (sometimes Editorial Director or VP Editorial) is the one who wrangles editors for each book and ensures that everything is getting done when it needs to be done; setting deadlines, developing new projects, and helping to plan the over-all direction that the company's publications will take.
The role wasn't really a solid thing at DC until the 70s, which makes it difficult to tell who should go into that field before that point. Additionally, the masthead/index does not always include the Executive Editor, which adds to the confusion.
To keep things easy, here is a list of Executive Editors at DC, and the years they were active (Months represent the cover dates they would first and last be credited):
- DC Comics:
- Whitney Ellsworth (1939 – 1952)
- Irwin Donenfeld (1952 – 1957)
- Carmine Infantino (August, 1968 – September, 1971)
- Joe Orlando (May, 1977 – May, 1983)
- Dick Giordano (June, 1983 – February, 1993)
- Jenette Kahn (March, 1993 – February, 1996)
- Mike Carlin (March, 1996 – August, 2003)
- Dan DiDio (September, 2003 – January, 2011)
- Eddie Berganza (February, 2011 – May 2012)
- Bobbie Chase (June, 2012 – present)
- Imprints:
- Vertigo Comics:
- Karen Berger (April 1993 – May 2013)
- Shelly Bond (June 2013 – June 2016)
- Wildstorm (and ABC):
- Jim Lee (inception – December 2003)
- Scott Dunbier (January 2004 – defunction)
- Vertigo Comics:
Cover Artist(s)
The CoverArtist field is where you list the artists who worked on the cover image.
If the art was by more than one artist, you can enter CoverArtist2, CoverArtist3, and so on to fill them out. Some covers are done by just one artist, some have a separate inker and colorist. All should be credited using that "1, 2, 3" system.
If there is a variant cover, you would then use Cover2Artist1, Cover2Artist2, Cover2Artist3 and so on. This adds a collapsible section wherein the variant cover's credits will be displayed.
If there are multiple variants, the pattern would continue with Cover3Artist1, Cover4Artist1, and so on, with the first number indicating which cover it is, and the second number indicating which artist it is.
Unofficially, the typical order for cover artists in credits should be penciler, inker, and then colorist. While nothing changes in terms of the categories if they are not in this order, it does help us keep things straight.
If more than one cover was completed by the same artist(s), there is no need to use Cover2Artist1, etc, but it can be helpful to do so, in order to distinguish it for readers visually, despite—again—there being no real affect on the categorization.
Internal Credits
The important thing to note about the internal comic credits are that we use a system of #_# where the first number indicates which story in the book it is, in the order it appears, and the second number is for adding multiple creators with the same job to that story.
So, in the case of a writer who worked on the first story, that field would be "Writer1_1" and if he had a co-writer, they would be "Writer1_2".
If there was a second story in the book, though, the writer on that story would be "Writer2_1" and a co-writer there would be "Writer2_2".
The same applies for all of the credits, including Pencilers, Inkers, Colorists, Letterers, and Editors.
We ask that when you add additional story credits that you group by story rather than by the creative role.
By this we mean Writer1_1 should be followed by Penciler1_1—not Writer2_1.
Just for the sake of understanding, let's go over what each creator credit means, and what role they play in the creation of a comic book.
Writers
A Writers' duties can cover a range of things.
While one writer may write a full script detailing much of the action you see on panel, others may write a simple plot outline and leave the rest to the artist before later adding dialogue (this latter is sometimes called the "Marvel Method" after Stan Lee's use of it for that company).
As far as we're concerned, anyone involved with the scripting, plotting, or dialogue is considered a writer.
If there are multiple writers with different roles, you can differentiate them with an editor's comment next to the name indicating their role, like so: <!-- Plot & SCript -->
This won't show up on the page, but it will be viewable in edit-mode.
Pencilers
As you might expect, the penciler draws the art for the issue, interpreting the writer's intention in a visually engaging way (hopefully).
Sometimes, though, what's called a thumbnail, layout, or breakdown artist will sketch out simple drawings of what the action in a panel should look like, and may lay out a basic arrangement of the panels as they would appear in print.
Then, they will either add more detail with their own pencils, have another penciler use their layouts as a base to work from, or simply pass on their layouts to an inker for what's called "finishing".
This is why sometimes you will see one artist credited for "layouts" and another for "finishes". In this case, we might use an editor's comment next to their names to indicate it.
In the case that there are multiple pencilers and the pages on which they worked are identified, this can be indicated with an editor's comment next to their name, like so: <!-- pages 1-12, 15, 18-20 -->
Inkers
An inker takes copies of the finished pencils, and uses ink (or in many cases digital tools) to tighten up the line work and add shadows and value to the image.
While they are not so much creative in their work, many have characteristic touches that they bring to a drawing, and their work is very important to establishing a mood and making the pencilled lines pop.
As mentioned above, we list artists credited with "finishes" as inkers, because they finish the layouts made by a penciler. As with Pencilers, you can use editor's comments to indicate who did what and on which pages.
In some cases, an artist or artists will be credited simply as "Artist(s)", in which case you will have to determine whether the artist did both pencils and inks, or—if more than one artist is listed—whether they shared the work as penciler and inker.
Colorists
A colorist brings life to an image with colour.
In this digital age, we see many colorists using computers to do their work, but in the past this has been done with markers and water colours.
Sometimes there are coloring studios like Hi-Fi Design where a group of people is responsible for the work.
Sometimes the work is done by two people, where one of those will be credited with "flats" or "separations".
This is a stage of coloring wherein basic swatches of colour or "flats" are placed over the art to give the main colorist something to build off of with tones, highlights, shadows and other visual effects.
If there are multiple colorists with or without multiple roles, you can add more as you would any other credit, and use an editor's comment to indicate their role if it is distinguished, like this: <!-- Separations -->
Letterers
In the past letters were typically written by hand, into the art, before it was inked.
While DC held onto that traditional lettering style even into the early 2000s, the vast majority of lettering at DC is done digitally, and is not even typically done by hand (via a tablet).
A font is first designed by a letterer, and then it is applied digitally.
As such, a letterer credit in the 50s might go to a person like Ben Oda, while a letterer credit in 2010 might go to a company or to the individual who designed the font, such as Richard Starkings' Comicraft lettering company, which specializes in comic book fonts.
There may even be more than one Letterer credited to one issue.
Editors
Editors have a number of responsibilities, not the least of which is identifying and establishing relationships with the talents who create the comics.
They also have roles in ensuring the continuity of the story, and carrying out edicts from the senior editorial staff (like the Executive Editor and Editor-in-Chief).
There is of course copy-editing and story editing to do on top of that.
These roles are sometimes split between a group of editors.
The Group Editor maintains the continuity of a group of related titles. For example, Dennis O'Neil was the Batman group-editor during the mid-to-late 90s. Overseeing both Knightfall and No Man's Land. There are also Associate Editors and Assistant Editors besides Editors themselves. Their roles vary, and—from our perspective, they are mysterious and manifold.
In any case, we list all four types of editor under the Editors field, and distinguish who did what by using editor's comments.
For the sake of convenience, we also typically list them in order of seniority:
- Group Editor
- Associate Editor
- Editor
- Assistant Editor.
Story Content
Quotation & Speaker
Off the bat, the page quote should come from the comic that the page is for.
It is important to note that there can only be one speaker in a quote, so be aware of that when selecting your quote. Try not to pick one that's too long. The best option is a quote that will make sense even if you haven't read the issue, so taking a smaller portion of a longer monologue can often suffice.
There are two perspectives on what exactly the quote field for a comic page should do, and neither is more correct than the other.
The first is that the quote should do something to sum up the plot and theme of the issue in as effective a way as possible. The second is to simply use the most awesome quote from the issue.
In a lot of cases, these are the same quote, but like we said, neither is more correct than the other. Both , however, are subjective.
Once you have chosen the quote, your next step is to type it into the field as it appears in the issue.
Because the quote field automatically italicizes the text, we use bold text to mirror the emphatic use of bold in typical comic book lettering.
The Speaker field is simply whoever spoke the line you just quoted.
Typically, we format this in a [[Direct Link to Speaker's Pagename|Name or Codename of whoever it is]] format.
It is important to use a direct link to the pagename of the character you are quoting, because the template will automatically categorize the quote to that character's quote-page, and if the link is incorrect, we'll end up with a bogus category listed—and that kind of thing doesn't help a soul!
Here's an example of properly filled out quote and speaker fields from Batman (Volume 2) #10:
| Quotation           = I know when you were a boy you thought you might find answers to your parents' murder in the Court of Owls, and my suspicion is that perhaps you were hoping you might find more answers '''now.'''
| Speaker             = [[Alfred Pennyworth (Prime Earth)|Alfred Pennyworth]]
Formatting Story and Appearances
Each story in the issue has a field for the story's title, a synopsis of that story, and a listing of appearances of characters, items, locations, and vehicles within it. We prefer to keep each story's associated three fields separate—which is to say, they are organized by the story they belong to, and not according to the field. So, for that reason, you would not see a comic filled out like this:
| StoryTitle1 = The Title of The First Story
| StoryTitle2 = The Title of the Second Story
Instead, it would look like this:
| StoryTitle1 = The Title of The First Story
| Synopsis1   = The Synopsis for the First Story

| Appearing1 = The Appearances for the First Story
StoryTitle
The "StoryTitle" fields refer to the title given to each individual story in the issue.
This typically appears on a "splash page" where the credits are also given.
Filling out this field sends the input to a number of places, including the infobox—separating the credits for multiple stories, and appearing at the top of the infobox in bold.
If the field is left blank, it will be referred to as "the first story," and "the second story", etc in the page text.
If credits are filled out for multiple stories, but only the first story is titled, the second story's credits will not appear unless its appearances and synopsis have been filled out, nor will they categorize, so be aware of that.
As shown above, StoryTitles are distinguished by a number. So, the first story's title goes under "StoryTitle1" and the second under "StoryTitle2" and so on.
Synopsis
The purpose of the synopsis is three-fold:
- It allows readers who have a book in mind to know if the book they are thinking of is the one whose page they are looking at (if they can only remember what happened in it, for example).
- It can provide clarity to readers who may not have understood what happened in the book by giving some context.
- It allows readers who couldn't find a copy of the issue for whatever reason to fill in the plot gaps between the issues they do have, so they don't have to worry about it anymore.
A synopsis should therefore give at least a basic idea of what goes on in the comic in question.
These can be short or long, but ideally, the best of these will provide the reader with all the information they need to understand what of importance happened in the issue, and how the story links to the previous or next issue in the series, if it is part of a series.
Again, ideally, the plot synopsis will read more like a story than a play-by-play of events, but the narrative simplicity of a Golden Age comic, for example would require far less work and detail than a modern day comic, with a comparatively complex narrative.
If there is more than one story, each Synopsis should be completed beneath its story title with the corresponding number, (StoryTitle2 and Synopsis2, StoryTitle3 and Synopsis3).
One important thing that is sometimes forgotten about writing plot synopses is that you must wikify them.
This means that when a character, location, item, etc, is mentioned in your synopsis, you should link it to the page in question using a wiki link.
To do this, simply wrap the name of the thing in question in double square brackets like so: [[Batman]].
You might also want to get more specific, and go to a direct pagename by "pipelinking", like so: [[Bruce Wayne (New Earth)|Batman]].
This will make sure that the text on the right of the pipe ("|") is displayed, while clicking the link takes you to the page with the name on the left of the pipe.
This ensures that anyone who's curious about a something or someone who you wrote about can find their way to learning more easily.
Appearances
Appearances are broken down by types of appearance. Generally, appearances should be listed in alphabetical order within each heading.
The Featured Characters are typically those who appear most prominently in the story. Most often, this is the same character who appears on the cover or in the title of the book, but in some rare cases that may not be the case.
A Supporting Character is any character who plays a major supporting role in the issue, whether they are allies of the featured character, or starring in a sub-plot. It is important to note that merely being an ally of the featured character does not immediately make a character part of the supporting cast—it is a subjective line to draw, using your best judgment.
Villains are any character who plays an antagonistic role in the issue. This should be determined by their actions in the story. It is not a matter of whether the character is usually a villain or usually a hero. It is based on their role in the story.
Other Characters are any named characters who play a role in the story. This could be a cameo appearance, or an image on a computer screen on-panel, or it could be the janitor in the building that's being robbed. If it were a movie, these would be the extras.
Locations can be any location that is shown on-panel in the comic. So, if the comic is set in Gotham City, you can tag Gotham City as an appearance.
However, don't go overboard. Just because Gotham City exists within the United States on the planet Earth doesn't mean those require tagging. Use your best judgment, but a rule of thumb is that if two locations of equivalent type (buildings, cities, states, countries, planets, solar systems, galaxies) appear, you should then list the next level up as well. So, if both Gotham City and Tokyo are mentioned, you would then have to also tag the United States and Japan. If the planet Mars appears, but so does Metropolis, you must then also tag the planet Earth. If Tokyo, Metropolis, Gotham and Wyoming appear, list all their states - Gotham and Wyoming are not equivalent . If it's just big cities, there's not really a need for states. Unless it's like "Random Town, Wyoming". Again, use your best judgment, this is a rule of thumb.
Items are any items that play a key role in the narrative. For example, if a story revolves around a character's alcoholism, then "Alcohol" may be an item you should tag. If Batman saves someone's life with his Batrope, his Batrope might be an item you'd tag.
However, that is not to say that you should tag every item you see. Batman wouldn't be Batman if he didn't wear his Batsuit. Therefore, it would be excessive to tag the Batsuit in every appearance of Batman, because it is there by default. As always, use your best judgment, and try to err on the side of minimalism.
Like most other fields, if you see a Vehicle in the story that has a prominent place in the DC Universe (such as the Batmobile or Wonder Woman's Invisible Jet), you should tag it. Do not, however, tag "The crooks' getaway truck". That is not what the appearances field is for.
In fact, you should not fill out any of these sections with phrases like "Unnamed henchmen" or "Bob's friends". The appearances section is specifically for named characters who play a role in the story, whether it be major or minor.
Mentioned characters, etc. can be listed as a reader might find a link to a mentioned character page useful but this is not a requirement. If you decide to list mentions, characters should be listed under the Other Characters heading after all characters that physically appear within the comic. Locations, items, etc. should be listed in their own headings after the appearances that physically appear. After linking the mention, add the {{Mentioned}} tag.
Template:A
To fill out the appearances, you should indicate each one by first using a bullet point (*). Then we use a special template called {{A}} ("A" is for "Appearance"), which we wrap around the link to any appearing character's page. This template adds the appearance to an Appearances category, which allows users to find other comics in which that character, item, etc, appeared.
Importantly, the {{A}} template must be wrapped around a direct link to the page in question.
So, if, for example, you wanted to say that Green Arrow appeared in an issue, you would not simply type {{A|[[Green Arrow]]}}
You would have to link to the version of Green Arrow who appears in that comic. So, if the comic were Green Arrow (Volume 6) #12, you would type {{A|[[Oliver Queen (Prime Earth)|Green Arrow]]}}.
Note that I used a pipe ("|") to "pipelink" directly to the article while displaying the name "Green Arrow" on the page.
Another tricky thing to note about appearances is that some of our more important pages have page names that don't match the "Real Name (Earth-Designation)" format. For example, Batman (Bruce Wayne).
The reason those pages don't use that format is because it helps our google results to do so. That is the only reason.
However, the categories for those pages still use the Real Name (Earth-Designation) format, which means that if you were adding an appearance (or a quote), you would still need to link to {{A|[[Bruce Wayne (Prime Earth)|Batman]]}} instead of {{a|[[Batman (Bruce Wayne)|Batman]]}}.
Confusing? Maybe a little, but it's more practical this way.
One last thing about appearances.
When you are linking to a team appearance, you can then add the appearing members of that team beneath that appearance by creating a sub-level in your bullet points by either adding a second (or third, or fourth) asterix (*) to the line.
For example, the appearances for the Justice League might look like this:
* {{a|[[Justice League (Prime Earth)|Justice League]]}}
** {{A|[[Bruce Wayne (Prime Earth)|Batman]]}}
** {{A|[[Kal-El (Prime Earth)|Superman]]}}
** {{A|[[Diana of Themyscira (Prime Earth)|Wonder Woman]]}}
Similarly, if you are adding appearances for locations, you can indicate places located within other locations by using the same method of indentation:
* {{A|[[United States of America]]}}
** {{A|[[California]]}}
*** {{A|[[Coast City]]}}
**** {{A|[[Ferris Aircraft]]}}
Comic Appearance Templates
Sometimes we use special templates to indicate something of note about certain appearances.
For example, we would use these templates to indicate a character's first appearance, or a character's death, or whether they appeared in flashback or a dream. A collection of these templates can be found here.
These are written on the same line as the appearance in question, and will appear in brackets and in green.
For example, the first appearance of Batman would be listed like this: * {{A|[[Bruce Wayne (Prime Earth)|Batman]]}} {{1st}}
Which would appear like this:
- Batman (First appearance)
If, for some reason, you need to come up with a note for a character's appearance that doesn't have a template already, you can use the template {{Green}} to add text like so: {{Green|Appears in a flash-forward only }}—which would look like this: (Appears in a flash-forward only).
Be careful, as some of these templates use category magic, so be sure to read each template's usage notes on its template page before using it.
Notes & Trivia
At the bottom of the page are sections for both Notes and Trivia. What's the difference, you ask? Well, read on.
Notes should typically be information that has to do with the continuity of the issue in relation to the rest of the DCU. They might also indicate something unusual about the publication of the issue (for example, that it was delayed by a month, or that the credits listed in the issue contained an error). Notes should provide information and context that will improve a reader's understanding of things that are not immediately made clear by the comic book, whether in or out of universe.
The line between Trivia and Notes is not always clear, and we are not especially strict with it.
Trivia might typically be for information and context that applies to something outside the DC Universe—something that exists in the real world. So, if a comic quotes a famous poet, you might list that fact and the poet's name in the trivia. If a character is given the likeness of a member of the creative team, that might also go under trivia.
So, while Notes would dig deeper into comics, trivia would dig you out of comics, and into some other place. While notes would likely use internal wiki-linking to send you to another page on the wiki to learn more, Trivia might send you instead to Wikipedia to learn more.
Multiple Notes and Trivia items should be separated by bullet points (*), placing every new point on a new line.
Recommended & Links
These are optional fields.
The Recommended field is for listing recommended reading which might benefit a user who wants to learn more about the featured character, or reading that might provide more context for a particular aspect of the story in that comic.
For example, a book that ties in to Infinite Crisis would surely have the Infinite Crisis page listed in its recommended reading.
We do have some templates that automatically add recommended reading links to the page when entered, such as {{Batman RR}}.
Links are external links that might provide context for the issue or featured character. This field should not be used to provide links to scans or pirated copies of comic books, whether they have fallen into the public domain or not.
Multiple recommendations and links should be separated by bullet points (*), placing every new point on a new line.